
Like in all other lawnmowers, your Briggs and Stratton engine may face diverse ignition issues in the long run or even for sitting idle for too long. But on the bright side, we present a whole guide to help you resolve all your problems with the Briggs and Stratton coil safely by yourself.
This guide contains the safest as well as easiest way to fix or replace your ignition components. But, before we start discussing the instructions, let’s have a look at the chart beneath that outlines common coil armature problems of our lawn mower engines and their possible solutions.
Briggs and Stratton Coil Problems
| Briggs and Stratton Coil Issues | Feasible Solutions |
| No spark at all | Test the coil & or spark plug (replace the faulty component) |
| Loose or Rusted connection and coil sparking after multiple try each time | Detach and clean armature module, then readjust it |
| The Motor makes hissing or knocking sounds | One of your coils is not functioning; replace it. |
No products found.
How To Remove An Ignition Coil On Briggs And Stratton Engines
Replacing the coil armature is a relatively straightforward job. But fixing a heavy machine is never risk-free. So, before you start, we advise you to take precautions and keep a safe distance each time you start the engine. Because it rotates dangerously, generates heat, and can damage you severely on contact.
To replace your ignition module, the following tools will come in handy. So, keep them close before starting. You can also use suitable substitutes for them, whatever works. Just make it safe.
- Wrench
- Monkey Wrench (5/16”)
- User Manual for your Briggs and Stratton engine (If you don’t have a hard copy
- Download yours using the model number of your engine
- Filler Gauge or a card having the required thickness
Before we start on the step-by-step instructions, consider going through the entire procedure once and start following on your end on the second read. This will narrow your chances of making mistakes even on the first go.
Let’s Begin:
- Unscrew the bolts of your engine cover and remove the cover.
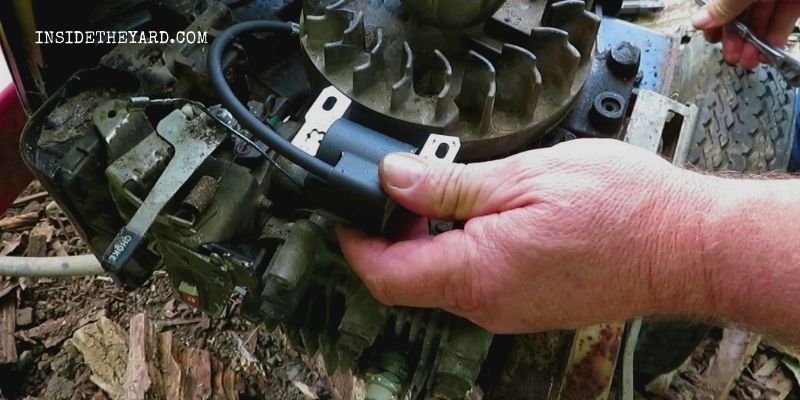
- Locate the coil by the flywheel or see your engine model’s manual to track it down.
- Take off the bolts fastening the coil to the motor. Then, safely disconnect it.
- You will find a wire underneath that goes to the ignition. Gently pull it to disengage the connection. And with it, your coil is now totally disconnected from the engine. If your engine has a twin-cylinder, disconnect kill wires from both coils attached to each one.
- Now keep a safe distance and test start. If it sparks, then the safety switch or short to ground is disrupting the engine sparks.
- Detach the cord connected with the spark plug end.
- Take the coil (or coils) out for cleaning or testing.
How To Clean And Test The Briggs And Stratton Coil Assembly
The tools you will need at this step are:
- Sandpaper or File
- User Manual of your Briggs and Stratton engine
- Multimeter (to test the resistance)
First, after you pull out the coil, see if it has rust in its mouth and then clean it with sandpaper or files. Then clear out the debris using a dry cloth. Since cleaning it may solve old Briggs and Stratton no spark issues. Now, you are ready to test the ignition coil.
For inspecting the resistance, you need three parts of your ignition coil identified and labeled. They are:
- Coil Base.
- Kill Wire.
- Spark Plug cap.
In the service manual, you will find an Ignition coil winding resistance diagram that presents the resistance limit in between any two of the three parts we mentioned.
- First, set your multimeter to test ohm and set the resistance for 20kΩ.
- Connect the first teeth of the multimeter to C and the Second to A. See the resistance resides within the limit set by the winding diagram of your manual.
- Test A to B, A to C, C to B, and check if it stays within the spec limit.
- If any of the reading goes beyond the limit, then you need to replace the ignition coil.
How To Reinstall A Coil On Briggs And Stratton Engines
To reinstall the coil or to plant a new coil on your lawnmower engine, the tools we mentioned in the removal guide will be adequate.
But before that, verify your replacement coil meets the specs for your engine. To double-sure, compare the replacement with the Briggs and Stratton OEM part. A replacement is a must when it shows Briggs and Stratton bad coil symptoms.
So, let’s begin reinstalling.
- Firstly, rotate the flywheel and line up the coil space with magnet marks of the flywheel.
- Place the coil as it previously were but don’t screw any bolts yet.
- Insert filler gauge with the correct measurement of distance according to the user manual in between the coil and the flywheel.
- Insert the screws keeping this distance so that the gauge doesn’t get stuck in between.
- Tighten the screws and snug the position, then again, rotate the flywheel, and your filler gauge should come with it.
- Reconnect the ground wire you took of from beneath the coil.
- Plug the ignition cord on the spark plug.
- Finally, clear out any debris or wire from your flywheel rotation path and put the engine cover on.
- Now, push the start switch or pull the start cord. See? Not much complicated at all.
How To Replace A Spark Plug On Briggs And Stratton Engines
Although, the spark plugs are more resistant to wear and tear than the ignition module. So, we expect cleaning or replacing the coil will solve your problem.
However, if the fix is not sufficient or you are not satisfied with the spark after troubleshooting, you can also change the spark plug.
In this case, you need to get the right one for your engine. The best option is buying an OEM part. Yet, if you opt for an aftermarket spark plug, be sure it is compatible with your ignition module and engine. To verify if it meets such specifications, compare it with the Briggs & Stratton spark plug part number, and you should be good.
Changing the spark plug connected to the coil assembly will be a piece of cake for you considering you underwent the previous instructions, at least in your head.
Here it is:
- Pop-off the spark plug from the ignition cord end
- According to Briggs and Stratton ignition coil wiring diagram, put the new spark plug while maintaining the required gap with a filler gauge.
- Then, reassemble the parts.
- Start and test the engine. Yes, it’s that simple.
So, we will be delighted if this guide saves you the trouble and time of looking for a technician.
This Video Will Help You Too!
Frequently Asked Questions (FAQs)
How do I know if my Briggs and Stratton coils are bad?
You have to inspect u003cstrongu003eBriggs and Stratton ignition coil symptoms u003c/strongu003elike no spark when you crank the engine, poor spark, poor rotation power, and weird sound for a twin-cylinder motor, etc. Moreover, according to our guide, you can test the ignition coil with a multimeter and rule it out as a bad one indisputably.
How do you test a coil on a Briggs u0026amp; Stratton engine?
To test the coil, you need the wire windings diagram of your coil, a multimeter set to test resistance, and a proper labeling and testing sequence. To avail of these in one place, please follow our guide.
How many ohms should a Briggs u0026amp; Stratton coil have?
Various Briggs and Stratton coils have various ohm requirements in between two of the three coil junctions (base, kill wire, and lead cap.) To know the ohm for your engine, stick to the service manual and test it with a multimeter to verify if they meet the engine specs.
How do you test a Briggs and Stratton coil with a multimeter?
To test your Briggs and Stratton coil with a multimeter, connect a combination of base, kill wire and spark plug cap with your first and second multimeter clip and set your multimeter to test resistance (in ohms), and rotate the indicator to 20kΩ. Test and see if it resides within the winding chart limit.
Bottom Line
None of our everyday equipment is above issues. But, if we ignore them, they can snowball and respond with bigger troubles.
Similarly, we explained how to resolve Briggs and Stratton coil problems to help you become a more accomplished homeowner.
You Can Also Read:
- Bad Ignition Coil Symptoms Lawn Mower- 5 Common Ones
- Kawasaki Ignition Coil Problems- 7 Problems & 1 Solution
- Kawasaki Liquid Cooled Engine Problems And The Ways To Solve Them
Was it helpful?

Enamored with the world of golf Jack pursued a degree in Golf Course Management at THE Ohio State University. This career path allowed him to work on some of the highest profile golf courses in the country! Due to the pandemic, Jack began Inside The Yard as a side hustle that quickly became his main hustle. Since starting the company, Jack has relocated to a homestead in Central Arkansas where he and his wife raise cattle and two little girls.